I don't understand whats going on. The preview looks fine. I tightened everything in machine. Slowed down speed.
Here is a picture.
http://www.mediafire.com/convkey/d962/9 ... 8leyzg.jpg
Could it be the infill pulling on model? Corners seem unaffected.
-
dodgersfan24
- Posts: 18
- Joined: Thu Oct 02, 2014 10:35 pm

Re: Shift when starting print in new process with infill
That looks like less of a shift and more like a crack or seperation. This is at a start point of a new process? If so did you look at the preview carefully to see if there is a 1 layer gap between processes? If you dont get the start and stop heights right where they fall close to a layer it will leave a gap.
-
dodgersfan24
- Posts: 18
- Joined: Thu Oct 02, 2014 10:35 pm
Re: Shift when starting print in new process with infill
Yes, the stop and start points match. And I don't see any gaps. My thought is that the problem starts when it builds the top and bottom layers of the last two processes. Which starts in the previous process. When laying down the 3 solid layers, it seems to be putting plastic on the walls. I'm going to do some test on a cube.
-
over-$-pent
- Posts: 9
- Joined: Wed Mar 11, 2015 9:33 pm
Re: Shift when starting print in new process with infill
Is this ABS? If so, it could be separation. On your multiple processes, are you turning off top solid layers on the first process and bottom solid layers on the second process to have a continuous print without solid layers where the processes end and begin? That also might cause some issues.
Re: Shift when starting print in new process with infill
try removing the top and bottom layers where the processes meet. those should be set to zero. this way the build will run all the way up with infill like it normally would with a single process. if that doesnt do it can you post the factory file?
-
dodgersfan24
- Posts: 18
- Joined: Thu Oct 02, 2014 10:35 pm
Re: Shift when starting print in new process with infill
I printed 2 cubes, one without the top and bottom layers. Both turned out fine. The one without the layers in between processes looks a bit smoother in between the changes. I'm going to go ahead and try out my model again with these settings.jimc wrote:try removing the top and bottom layers where the processes meet. those should be set to zero. this way the build will run all the way up with infill like it normally would with a single process. if that doesnt do it can you post the factory file?
-
dodgersfan24
- Posts: 18
- Joined: Thu Oct 02, 2014 10:35 pm
Re: Shift when starting print in new process with infill
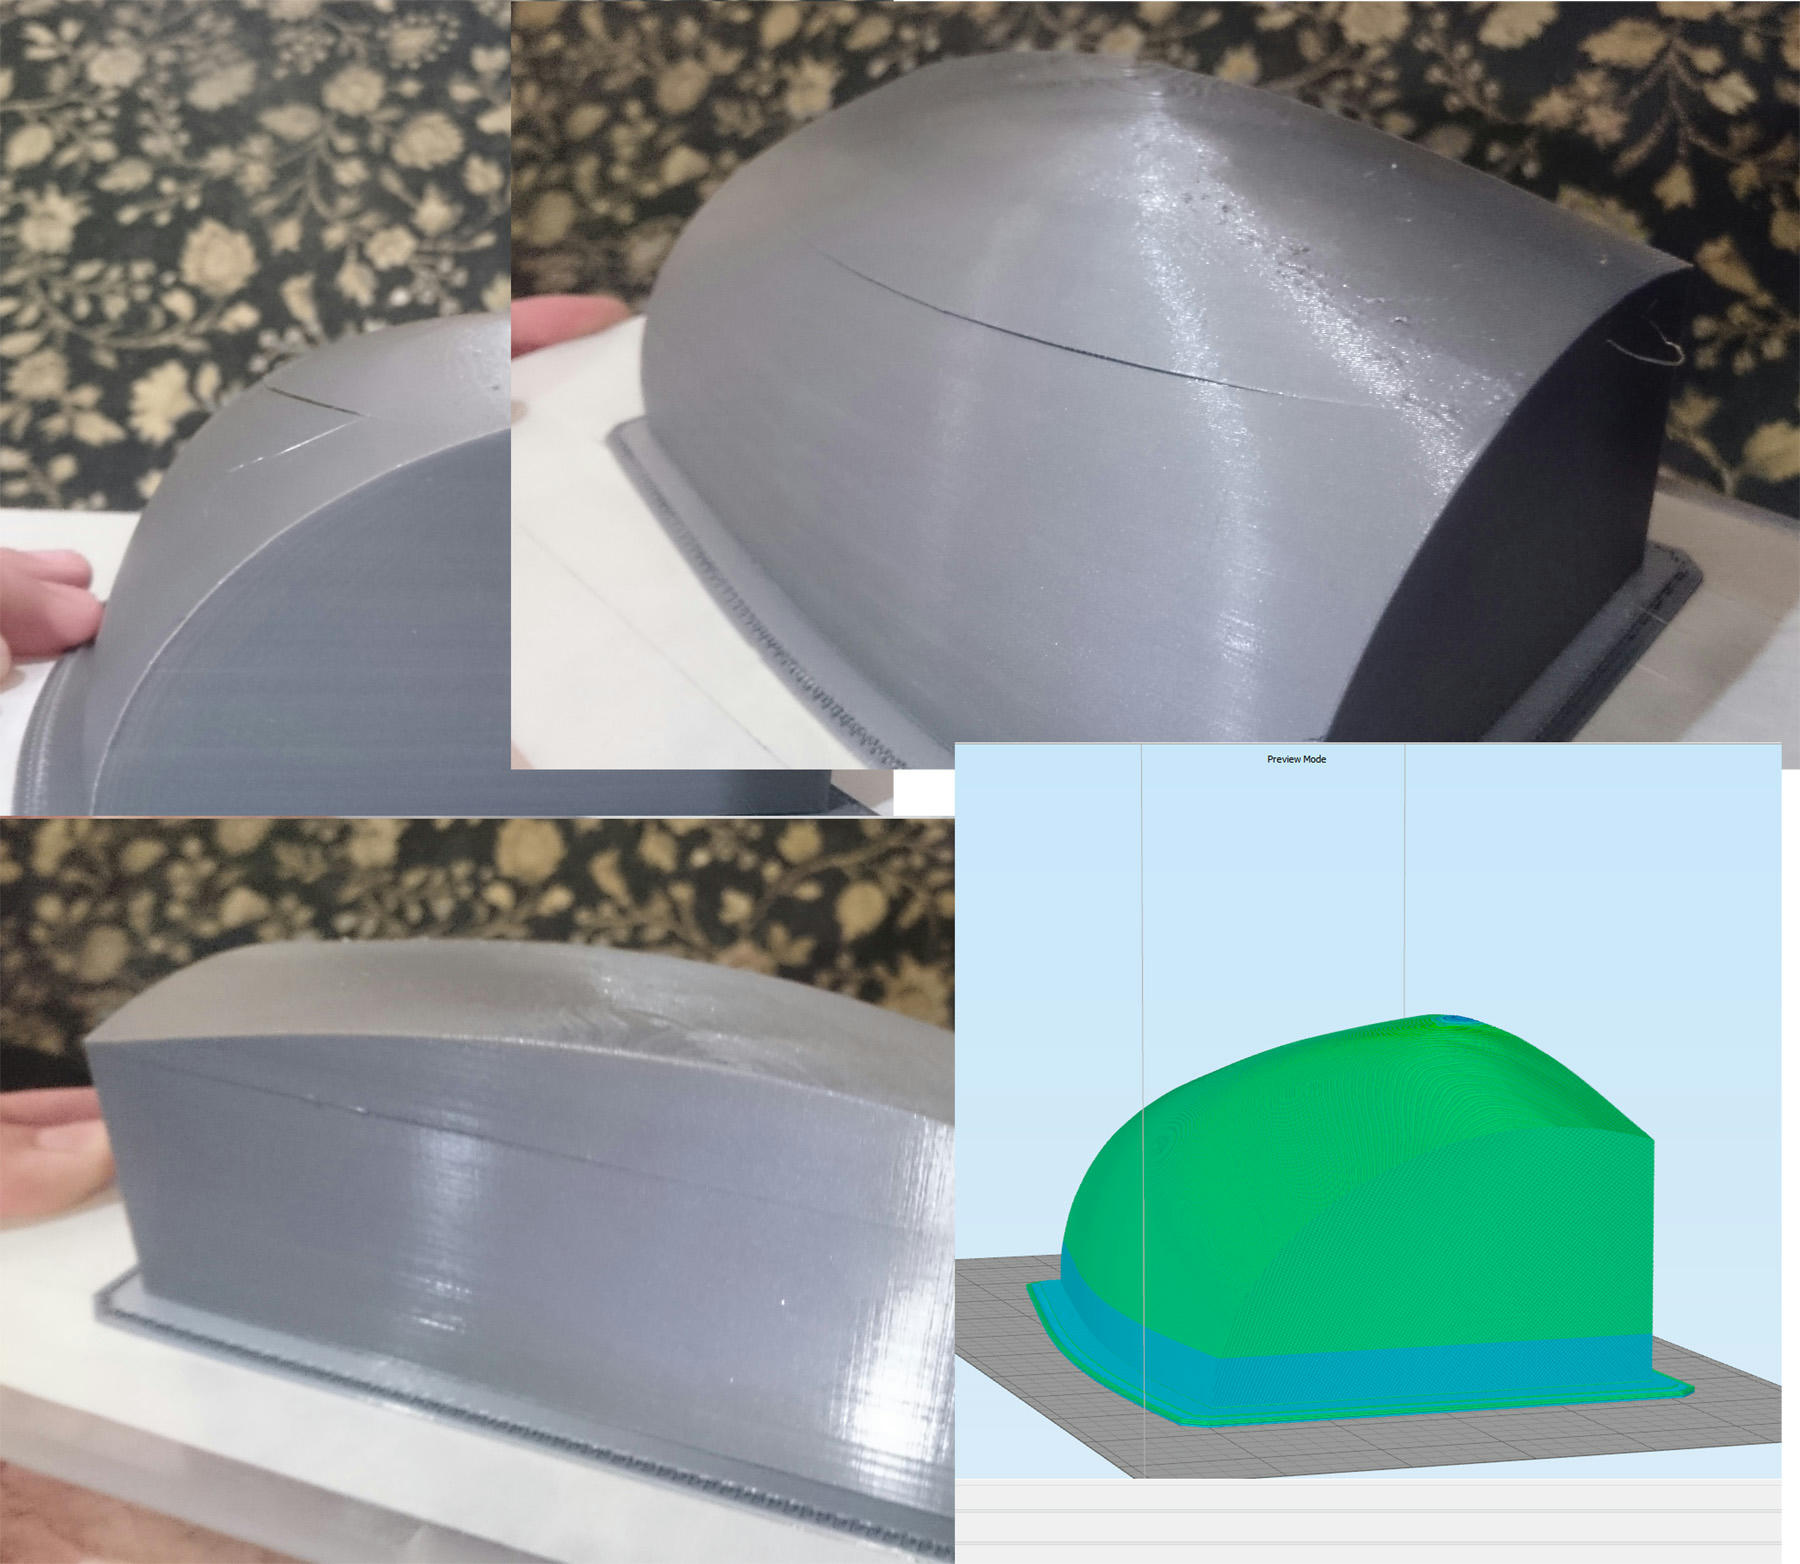
I printed out the part again and it still happened. Far less, but still visible. I removed the bottom and top layers between processes, and only left infill. It doesn't seem visible on vertical edges. Here are pictures and factory file if someone would be kind to check it out.
https://www.mediafire.com/folder/az39qq ... 3D%20Print
https://www.mediafire.com/folder/az39qq ... 3D%20Print
Re: Shift when starting print in new process with infill
I was curious why you still saw a slight ripple on the vertical wall of your print (the angled walls look great).
I'm a big fan of using the S3D Preview mode for diagnosis, so I tried to find the problem in the Preview mode (also, I didn't want to start a 7-hour print!). Using the cross-section tool, I discovered that you started an infill process at about the same height where you are seeing that ripple on the outside of your print (see attached images). So I might suggest that the additional force being created with the start of your infill process created a slight bulge on the vertical wall.
I'm not sure of the correction.....maybe someone like JimC can comment, but it sure seems that the start of the infill process caused the (barely visible) ripple on your vertical wall.
- Attachments
-
-
-
-
DarthRevan

- Posts: 480
- Joined: Wed Feb 18, 2015 8:29 am
Re: Shift when starting print in new process with infill
I'd like to suggest printing infill in the entire model. The pressure upon the walls will be much more equally distributed when not suspended from just the upper section of your model.dodgersfan24 wrote:I printed out the part again and it still happened. Far less, but still visible. I removed the bottom and top layers between processes, and only left infill. It doesn't seem visible on vertical edges. Here are pictures and factory file if someone would be kind to check it out.
https://www.mediafire.com/folder/az39qq ... 3D%20Print
This increases print time to about 15 hours. If you're worried about this increasing the print time, you can use sparse infill layers to save a bit of time. Turning sparse infill to occur every 2 layers drops the print time down to 11 hours.
When you did your cube test, did you have infill throughout the entire cube, or just the top process?
-
dodgersfan24
- Posts: 18
- Joined: Thu Oct 02, 2014 10:35 pm
Re: Shift when starting print in new process with infill
@Darthraven
No on the cubes had a similar process. Only difference in between the cubes, on one I had solid layers on top and bottom between the process. They didn't effect either print. Probably because of strait edges. Just as the sides of my prints seem fine.
As Tri-Lite said. I took apart my messed up models to examine the ripple. I notice below the ripple, it looked like a raft. So I supected that it was printing the infill/(top/bottom layer) before the outer walls. So the outline perimeter of the infill, or T/Bottom layers, was overlapping the inner part of the wall of the previously printed layer. So when the infill layer had finished printing, it then printed the wall of that layer, that was pushed out by the hardened perimeter of the infill/TBottom layers.
SOLUTION: Edit: NOT A SOLUTION
On the layer settings, there is an option to print layers Inside-out, or Outside-in. Mine had Inside-out by default. If you switch this setting to Outside-in, it solves this problem.
I printed out a small statue with lots of detail, and it had 0 flaws between these layers. And it had 8 processes. I printed a 5.5 in tall Buddha statue in 7 hrs at high resolution. I'm now able to print out another large piece with confidence.
Last edited by dodgersfan24 on Thu May 21, 2015 3:14 pm, edited 1 time in total.