Darkly spectre
Posts: 13
Joined: Fri Nov 28, 2014 9:11 am

So I did my first print using simplify3D aaand WTH

So I got my settings for my sharebot NG to be used on simplify by the store I bought my sharebot from.

so loaded it up and decided to print one of the cookie cutters that I had laying around;

so this is it when i first load the STL up

Image

seems fine

then I prepare for printing and this happened

Image

instead of printing the thinner shape(the cutting bit) it just...decides to make pillars?

I decided to print it anyway

and bam

Image

what the hell happened?

this is a version I printed off using slic3er

Image

anybody have any ideas?
User avatar
jimc
Posts: 1124
Joined: Wed Aug 28, 2013 11:02 pm
Location: mullica, nj
Contact: Website

Re: So I did my first print using simplify3D aaand WTH

Most likely the walls are too thin. If the wall is thinner than your extrusion width x 2 then it wont print. S3d currently wont print a single wall. There is always an inner and outer perimeter. Hopefully this will change soon and they will add this feature. It was like this with most slicers until recently. Most have just recently added this feature. S3d hasnt had an update since sept. Maybe it will be on the next one.....maybe not.
JoeJ
Posts: 1435
Joined: Sun Feb 16, 2014 10:52 am

Re: So I did my first print using simplify3D aaand WTH

yea, it looks like the walls are thinner than your extrusion width. But there are some nice settings you can use for exactly this reason.

here's how I would print this part. For the bottom section, you want a stronger, wider print, so maybe 2 perimeter outlines with 40% infill. Then for the top "cutting" piece, you really only want a single perimeter outline. So we are going to make 2 processes, one for each region. This way you can actually use different settings for the different regions (they have a tutorial on this if you are interested: http://www.simplify3d.com/support/tutor ... f-a-model/).

For example's sake, let's say that the transition between the bottom section and the thin cutting section occurs at a Z-height of 8mm. You can use the cross section tool (View > Cross Section) if you need help figuring out the exact location of the change on your model.

Process 1 - Choose 2 perimeter outlines, 40% infill, and then go to the Advanced tab and enable the "Stop printing at height" option and enter a value of 8mm. This way, this process will only print from 0-8mm.

Click "Add" in the main window to add a second process.

Process 2 - Choose only 1 perimeter outline, 0% infill, 0 top solid layers, and 0 bottom solid layers. Then go to the Advanced tab and setup as follows: make sure the "Stop printing at height option" is disabled and then enable the "Start printing at height option" and enter the same value of 8mm. This way the process will start printing at 8mm and continue for the rest of the model. Finally, there is one more change to help ensure that you get a perfect single-outline print. Enable the "Merge all outlines into single solid model" option.

When you slice, just select both processes and the software will merge them together. This is a really powerful option to use for parts that need different settings in different regions. For example, if you wanted, you could have even used the helical vase mode for that second process since it can have completely different settings than the first process.

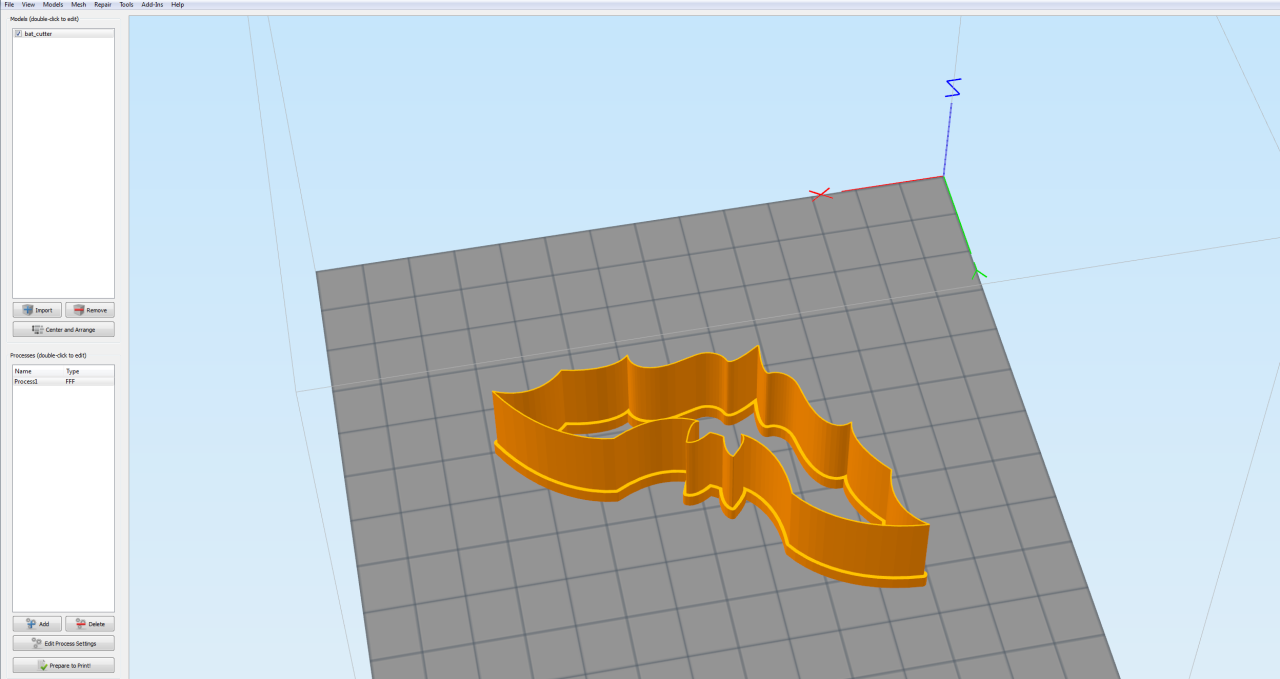
I tried this with one of the other batman cookie cutters I found on Thingiverse. You can see a screenshot of the results below.
Batman.png
tri-lite
Posts: 68
Joined: Tue Dec 10, 2013 7:08 am

Re: So I did my first print using simplify3D aaand WTH

That advice sure is helpful - I think everyone close to me will receive a batman cookie cutter for Christmas ;)
Darkly spectre
Posts: 13
Joined: Fri Nov 28, 2014 9:11 am

Re: So I did my first print using simplify3D aaand WTH

Tried it. had to do some fiddling.

if I tried to do the "start printing at 8mm" the second setting would float above the first one. putting it at anything lower than 6mm seems to make it connect perfectly.

haven't tried printing it out yet. having other issues with initial printing.

when I tend to start printing the extruder doesn't put out any filament till from what I can see the second layer. like it would be doing the skirt. nothing comes out. then it goes to the printing of the actual object and it would just put out nothing and then it suddenly starts putting out filament ending up with messed up prints since the bed had already started lowering.

honestly no idea what is going on. I am guessing its the primary layer height.

the sharebot NG can go as low as 0.05mm. if I try printing at anything lower than mmm 0.13 the issue pops up of nothing extruding at all. trying 0.11 right now and it had that issue. any ideas on that?

fiddling around alot and slowly getting the hang of the settings though.

though had issues with 2 prints just stopping and the machine controller giving me a "firmware unresponsive" error. I hope my sharebot isn't screwing up already.
User avatar
jimc
Posts: 1124
Joined: Wed Aug 28, 2013 11:02 pm
Location: mullica, nj
Contact: Website

Re: So I did my first print using simplify3D aaand WTH

concerning it not putting out filament......does your printer do a purge cycle before it starts printing the skirt? it usually would move the head off the corner of the bed, extrude 20mm or so of filament, wipe it off on the corner then move over to start the skirt. if it does that and you get plastic extruding then it should begin printing the skirt almost immediately. if runs that cycle ok and it does not print then most likely your nozzle is so tight to the bed it is blocking it off and keeping filament from coming out. its like putting your thumb over the end of a garden hose. take a look in the gcode tab and make sure the offsets are all set to zero. if they are then you need to readjust your z-stop on the printer. for the firmware unresponsive error, there was a thread recently on that within the last week or so. do a quick search. im not sure if a cause or solution was found. no dual processes like joe posted, your first process would stop at 8mm then your second would start at 8mm. if you do that then you should not have a gap between.
Darkly spectre
Posts: 13
Joined: Fri Nov 28, 2014 9:11 am

Re: So I did my first print using simplify3D aaand WTH

jimc wrote:concerning it not putting out filament......does your printer do a purge cycle before it starts printing the skirt? it usually would move the head off the corner of the bed, extrude 20mm or so of filament, wipe it off on the corner then move over to start the skirt. if it does that and you get plastic extruding then it should begin printing the skirt almost immediately. if runs that cycle ok and it does not print then most likely your nozzle is so tight to the bed it is blocking it off and keeping filament from coming out. its like putting your thumb over the end of a garden hose. take a look in the gcode tab and make sure the offsets are all set to zero. if they are then you need to readjust your z-stop on the printer. for the firmware unresponsive error, there was a thread recently on that within the last week or so. do a quick search. im not sure if a cause or solution was found. no dual processes like joe posted, your first process would stop at 8mm then your second would start at 8mm. if you do that then you should not have a gap between.

Nope. printer doesn't do a purge cycle. Don't know if it's the printer's fault or simplify since I am printing directly through the USB connection.

well. I fixed it. seems like the bed was indeed calibrated too high on the corner screws. mmm didn't do anything different involving calibrating it. quick question that has been bugging me. when you use a piece of paper to calibrate the corner screws. how tight is the paper supposed to be? I mean i have seen people talk about the extruder having to scrape the paper and hard to move. some say that you have to feel a slight resistance. some have said no resistance and it is confusing me quite abit.
User avatar
jimc
Posts: 1124
Joined: Wed Aug 28, 2013 11:02 pm
Location: mullica, nj
Contact: Website

Re: So I did my first print using simplify3D aaand WTH

The problem with a piece of paper is a piece if paper is not a standard masurement. All paper varies in thickness. Do yourself a favor and pick up a set of feeler gauges. Any auto parts dtore should have them for a few bucks. I know my printer is right when it homes the z acis and there s a .005" gap. Any time you check clearances on anything it is NEVER tight. It is just a slight drag
Darkly spectre
Posts: 13
Joined: Fri Nov 28, 2014 9:11 am

Re: So I did my first print using simplify3D aaand WTH

mmm that sounds like a decent idea. now to find those over here.

quick question. how do you make simplify wipe the nozzle at the beginning of the print. now it drops that bed quite a bit while the extruder moves into place. when I use slic3r it just stays at the 0 position on the bed causing the oozing filament to get wiped on the side of the glas plate but I don't know how to do it in simplify. I tried that wipe nozzle option but it doesn't do anything.
User avatar
KeyboardWarrior
Posts: 480
Joined: Thu Jun 19, 2014 5:02 pm

Re: So I did my first print using simplify3D aaand WTH

Darkly spectre wrote:mmm that sounds like a decent idea. now to find those over here.

quick question. how do you make simplify wipe the nozzle at the beginning of the print. now it drops that bed quite a bit while the extruder moves into place. when I use slic3r it just stays at the 0 position on the bed causing the oozing filament to get wiped on the side of the glas plate but I don't know how to do it in simplify. I tried that wipe nozzle option but it doesn't do anything.
This is under Scripts-->Starting G-Code. If you need help modifying the G-Code, copy-paste the contents here and I'd be glad to help add a wipe in there!

Return to “General Discussion and Tips”